8.31.2011

Dora Fiesta!

Hola!  Ready for a fiesta? Vamanos! Let's go!
Dora & Boots! This cake is all buttercream on the outside.  That's right, NO fondant at ALL! The drawing is hand-drawn with frosting.  Wanna see a little closer? Ok, since you asked nicely...

Hooray! Now, you can't see it, but there are flowers, grass, and trees around the sides of the cake too.


Want a Dora cake for your little explorer? Contact me!

Now for some tips and tricks to achieve smooth buttercream similar to the finish of this cake:

Tips/Tricks
  • For smoothed buttercream that looks like fondant, work with a buttercream that is fairly thick and workable. (If your buttercream is thin, just add a bit more powdered sugar)
  • For thick buttercream, use an unquilted paper towel to polish off the look.  Carefully place the paper towel on the top of the cake and rub lightly in circular motions, picking up the paper towel and checking for a smooth finish periodically.  Then, do the same for the sides of the cake, working with a turntable for easy maneuvering. **Note:  make sure your buttercream is not sticking to the paper towel!! If so, the towel will pull the frosting off, which is no good at all**
  • For thin buttercream (if you've used a thinner consistency to cover the cake) get a little crazy with vodka.  Yes, I said vodka...as in the alcohol.  Put a little in a spray bottle (you can use the cheap stuff) and LIGHTLY spray the cake.  Then, with an off-set spatula, carefully smooth out the buttercream.  It makes the cake very smooth and the buttercream will look flawless once you get the hang of it. The alcohol will evaporate quickly and leave you with a smooth, dry cake. **You do NOT want the cake super damp and/or wet.  Remember, you're smoothing out the icing, not trying to start a happy hour.**

8.29.2011

It's What's Inside that Counts

Ever watch the show "Kids Say the Darndest Things" back in the 90s?  Well this cake was made for a little girl with a definite opinion.  When asked what type of cake she wanted, she said "purple!"  What about the flavor? She replied, "purple!!"  Well, I aim to please.
The butterfly and flowers matched the party invitations, but the color was all Natalie's idea.  And it doesn't stop there.  The vanilla cake was marbled white and purple inside.  You'll just have to trust me on that one.  Best part, the little girl was so surprised!!

8.28.2011

Gettin' Sporty

My favorite thing about decorating is making a cake that's special.  You know, one that means something to the recipient.  Go big or go home, yes? I think so too.
Talk about a learning experiment (experience, whatever).  This cake taught me how to make a peanut butter cake and pb frosting!  Aaaaand that a chocolate piped cage should NOT be exposed to sunlight in Texas (even in an air conditioned car). It. will. melt. Still one of my favorites, though. :)

And for all the tennis players out there:
This really was a special cake.  The racket was a replica of the recipient's own.

So there ya have it. Special cakes for special people.  Never be afraid to get creative!! Yes, it could be a disaster, or it could be fabulous.


Everything's Topsy Turvy!

In keeping with the theme (and because this was chronologically my next cake) here's another bridal cake! This time, for a bridal shower. But not your average stacked, pretty, girly cake.  Everything's gone topsy turvy!
A little bit of classic design, a modern edge, and someone got crazy and spilled the champagne.

Ever wondered how a topsy turvy cakes are created?  It's all in the illusion.  There are many ways to actually create the design.  Ok here I also have to admit, I typed out the instructions but it got too long-winded and confusing.  As with all other things, YouTube is a wonderful teacher. :) (Seriously, what did we ever do without that website??)

But I DO have some tips/tricks for topsy turvy and other cakes:

Tips/Tricks 
  • Cakes are only supposed to look like they are falling over.  Unless you want a big mess, and wasted decorating time, be sure to put supports in your tiered cakes.
  • Within the layers, place small candy or popsicle sticks in the cake that are cut to the appropriate length.  The top of the stick should be flush with the top of the icing on your cake.  
  • You will need a main support to secure all layers together.  These can be bought at specialty and craft stores. Again, the top of the support should be flush with, or just below, the top of the cake.  You can disguise the hole with a little fondant or frosting.  
So there ya go, that's the mystery behind the whimsical topsy turvy cake. Ready to create your own? Good luck!! 

8.26.2011

Here comes the bride's cake!

Let's face it, one of the best parts of the wedding is the cake.  (General merriment and eternal love aside, of course) And before the wedding comes the bridal shower, which involves gift-giving, more merriment, and an opportunity for another special dessert.

For a wedding shower, you may want to go with something elegant that will please a crowd.  I'd recommend a design that matches your decor and a flavor that will please the majority of the shower guests.
This cake is vanilla on the first tier and chocolate on the second.  A little fondant makes for a nice smooth result that was the centerpiece of the party table.  If you're wondering, yes the chocolate fondant tastes a bit different.  This one is chocolate colored and flavored, and tastes like a Tootsie Roll!

And when it's time for the big day, something a little more extravagant:
Note:  These cakes were NOT for the same bride.  And I did not pick the colors for the second cake.  The orange and yellow were their wedding colors.  It actually turned out to be a very pretty wedding set-up (yes, the colors threw me off at first).  This cake is also fondant with a fondant heart spray on top.

It's so wonderful to feel as though you're helping someone with their special day by making a pretty cake.  As always, if you have an upcoming wedding or shower, I'd be honored to work with you to design a cake!

Hittin' the Books

Time for back to school?  Yuck.  Ok so all of you parents out there are probably saying "Thank goodness!!"  I sympathize with the kiddos out there.  My classes just started for the fall semester and I was NOT ready to begin another round.

In the spirit of school, books, general knowledge, I present to you this oldie but goodie.
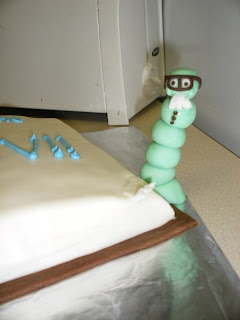
Back in the day, I was a proud member of Aggie School Volunteers.  This was our kick-off meeting's dessert. (Howdy to all of you fellow ASV-ers out there!!) It was another vanilla cake to satisfy the masses.  What's that you ask? What makes this one of my favorite cakes?  This little guy!
This mischievous little bookworm is eating our book!  The puffy cheeks are evidence. (See, he thinks fondant is delicious too) To this day, he's one of my favorite characters I've created.

Now, let the new school year begin!


Customized

When it's someone's birthday, it's important to make it special.  After all, it's their day!  For my friends, that usually means customized cakes (flavor or design).  Let's face it, I usually have to just go with it and hope that the flavors turn out. Always an adventure when working with cake.

For the girl who loves cheesecake, but still wanted a traditional cake...this concoction (err..creation) came to be:

Yep, that's vanilla cake layered with cheesecake and strawberry filling. It's all topped with whipped cream.  Yum!!


For something a little more tropical, how about a pina colada cake for a 21st birthday?
 

Love Oreo cookies?? Welcome the cookies 'n cream cake!
Specifically, chocolate cake with cookies 'n cream buttercream.


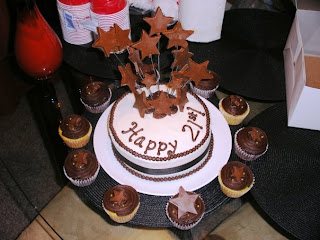
And last but not least, a Nutella cake (and cupcakes) for the chocolate lover!
For this one, Nutella was swirled into the batter and created the filling between layers.

Hopefully each of these made the recipient feel like the star of their special day!  It's always fun to create/experiment with new flavors.  My failed attempts at special flavors aren't shown but do trust, there are a few :)